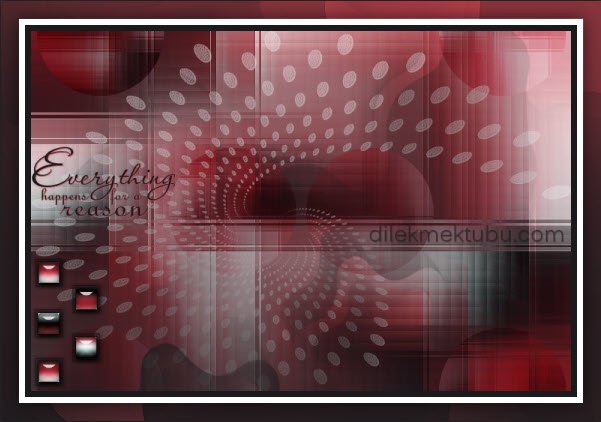
Psp Tutorial, Everything
Everything
English Psp Tutorial
This tutorial was created with Corel X7.
However, it can also be done with other versions.
Thanks Gabry for the beautiful tube.
However, it can also be done with other versions.
Thanks Gabry for the beautiful tube.
Thanks Narah for the beautiful masks.
Thank you very much for the beautiful Translations.
You can access the translations by clicking on the flags.


Thank you very much for the beautiful Translations.
You can access the translations by clicking on the flags.
Your Versions HERE 
Plugins
Mehdi – Wayv Lab 1.1
Mehdi – Shorting Tiles
I.C. NET Software – Filters Unlimited 2.0
Bkg Designer sf10 I – Cruncher
Background Designers IV – Splash
Special Effects 1 – Binoculars
Alien Skin Eye Candy 5:Impact – Glass
Alien Skin Eye Candy 5:Impact – Perspective Shadow
Materials
Deco-Everything
NarahsMasks_1532
NarahsMasks_1540
Text-Everything
Selection : Everything-Dilek
Preset-Glass
123-Gabry: Women Tube
Colors-Everything
 or
or 
Colors

Preparations
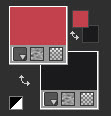
Make the foreground color : #c2424e
Make the background color : #1b1b1d
Open the masks in PSP and minimize them with the rest of the material.
Copy the Selection in the Selections Folder.
Double click on the Alien Skin / Glass presets to install them.
We start working
1.
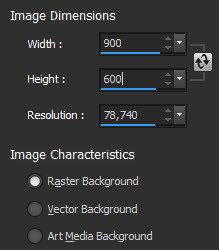
Open the new transparent image of 900 x 600 pixels.
Effects – Plugins – Mehdi – Wavy Lab 1.1

Adjust – Blur – Radial Blur

Effects – Plugins – Mehdi – Sorting Tiles

Effects – Plugins – I.C. NET Software – Filters Unlimited 2.0
BKg Designer sf10 I – Cruncher : Default

Effects – Edge Effects – Enhance
2.
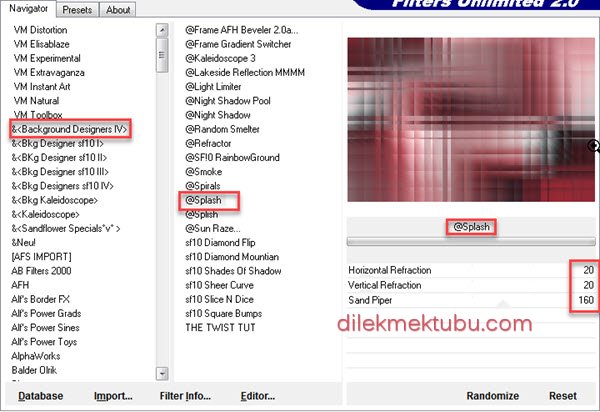
Effects – Plugins – I.C. NET Software – Filters Unlimited 2.0
Background Designers IV – Splash : Default
Layers – Duplicate
Layers – Properties – Blend Mode : Overlay and Opacity : 55

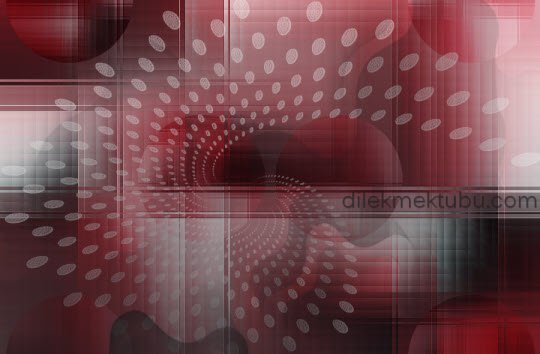
Result

Layers – Merge – Merge Down
3.
Layers – New Raster Layer
Fill with the white color : #ffffff
Layers – New Mask Layer – From Image – NarahsMasks_1540

Layers – Duplicate
Effects – Edge Effects – Enhance
Layers – Merge – Merge Group
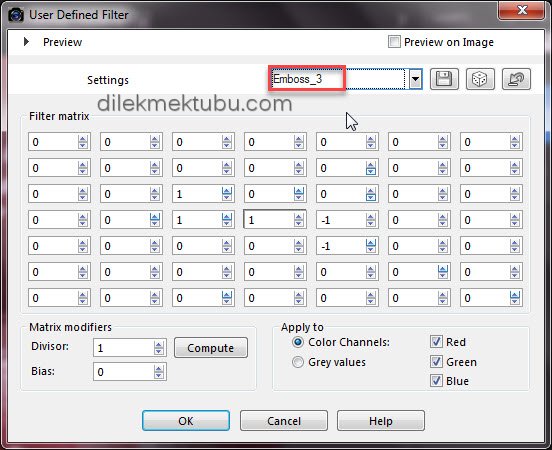
Effects – User Defined Filter – Emboss 3
Layers – Properties – Opacity : 45
Layers – New Raster Layer
Fill with the background color : #1b1b1d
Layers – New Mask Layer – From Image – NarahsMasks_1532

Layers – Merge – Merge Group
Image – Mirror Vertical ( Old versions Flip )
Adjust – Sharpness – Sharpen
Result

4.
Activate the Raster 1 Layer

Layers – Duplicate
Effects – Plugins – I.C. NET Software – Filters Unlimited 2.0
Special Effects 1 – Binoculars – Distance : 130 – Size : 100
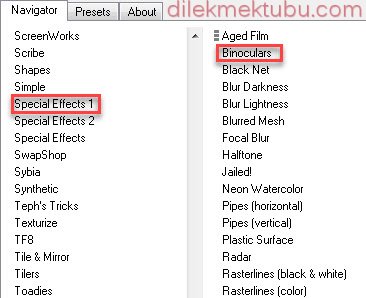
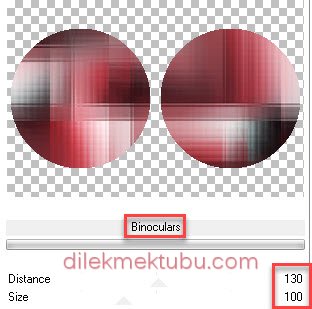
Image – Resize – 50 Percent ( resize all layers not checked )
Effects – Image Effects – Seamless Tiling : Default
Layers – Properties – Blend Mode : Soft Light

Layers – Merge – Merge Visible
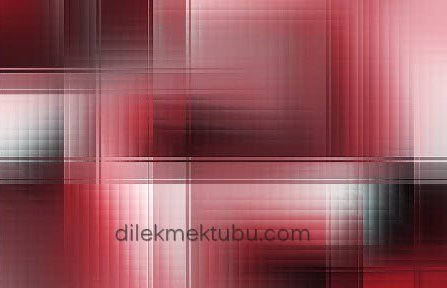
Result
5.
File – Open – Deco – Everything
Edit – Copy
Go back to your work.
Edit – Paste As New Layer
Go back to your work.
Edit – Paste As New Layer
Activate the Pick Tool(K) 
Position X : 5 – Position Y : 378
Press M to close the Pick Tool.
Press M to close the Pick Tool.
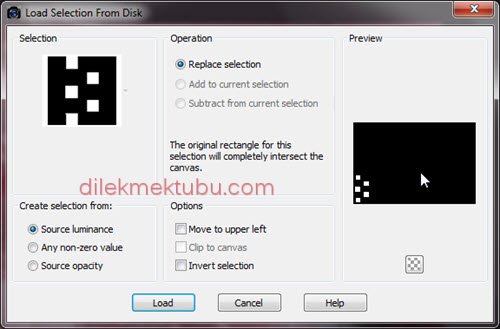
Selections – Load/Save – Load Selection From Disk – Select : Everything
Make the foreground color : #c2424e
Make the background color : #1b1b1d
Effects – Plugins – Mehdi – Wavy Lab 1.1
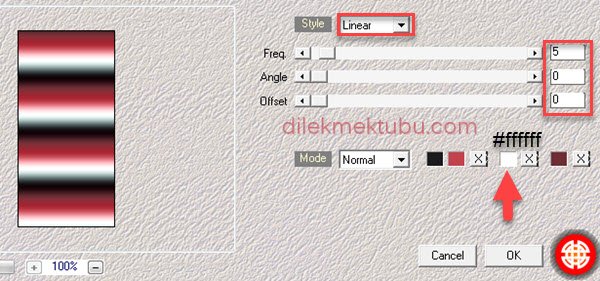
Effects – Plugins – Alien Skin Eye Candy 5:Impact – Glass
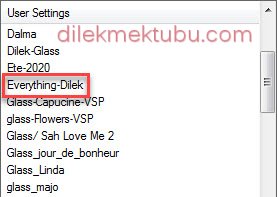
Select the Everything-Dilek preset.
If you have a problem loading, enter the settings below.

Selections – Select None
Effects – Plugins – Alien Skin Eye Candy 5:Impact – Perspective Shadow
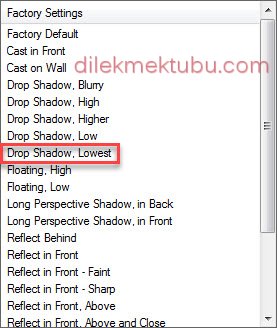
6.
File – Open – Text-Everything
Edit – Copy
Go back to your work.
Edit – Paste As New Layer
Go back to your work.
Edit – Paste As New Layer
Activate the Pick Tool(K)
Position X : 0 – Position Y : 190
Press M to close the Pick Tool.
Press M to close the Pick Tool.
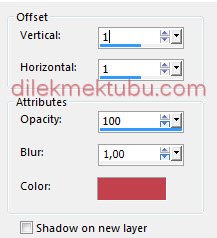
Effects – 3D Effects – Drop Shadow : 1 1 100 1 – foreground color : #c2424e
7.
Image Add Borders 10 pixels background color : #1b1b1d
Image Add Borders 10 pixels foreground color : #c2424e or #ffffff
Selections – Select All
Image Add Borders 30 pixels background color : #1b1b1d
Selections – Invert
Selections – Promote Selection to Layer
Layers – New Raster Layer
Fill with the foreground color : #c2424e
Layers – New Mask Layer – From Image – NarahsMasks_1532
Layers – Merge – Merge Group
Effects – Edge Effects – Enhance
Selections – Invert
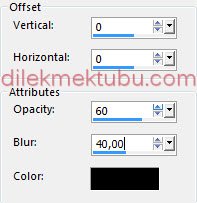
Effects – 3D Effects – Drop Shadow : 0 / 0 / 60 /40 Color : #000000
Selections – Select None
Layers – Merge – Merge Down
Image – Mirror – Mirror Horizontal ( Old versions Mirror )
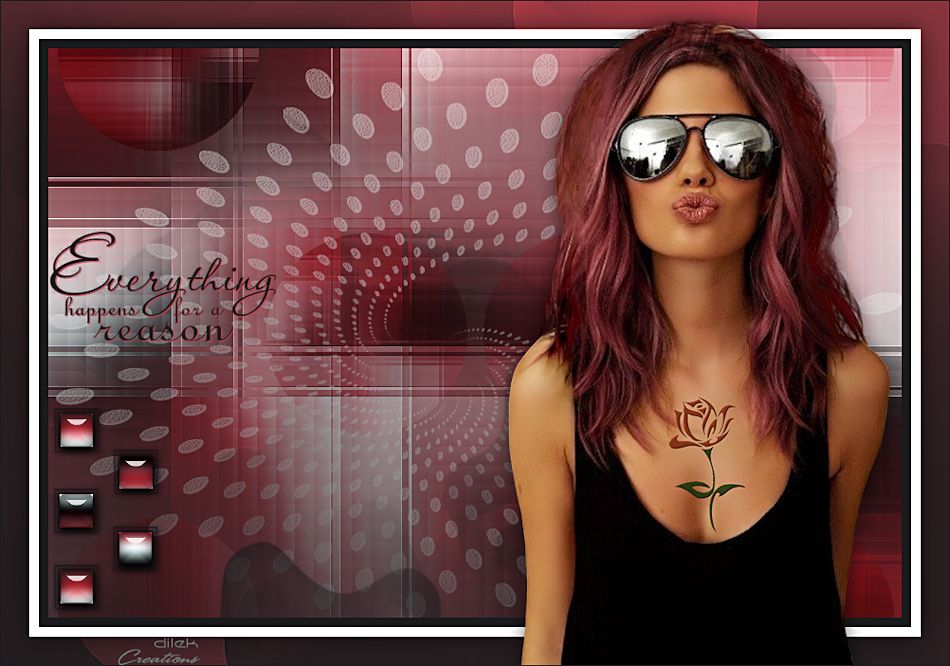
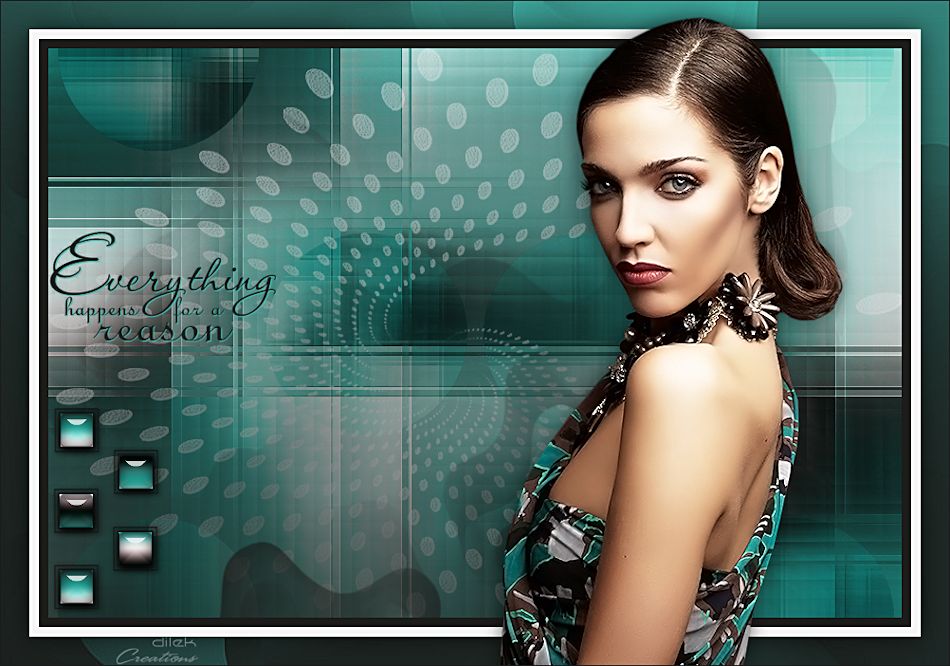
Result
8.
File – Open – 123-Gabry Tube
Edit – Copy
Go back to your work.
Edit – Paste As New Layer
Go back to your work.
Edit – Paste As New Layer
Image – Resize : 80 Percent ( resize all layers not checked )
Activate the Pick Tool(K)
Position X : 534 – Position Y : 6
Press M to close the Pick Tool.
Press M to close the Pick Tool.
Adjust – Sharpness – Sharpen
Effects – 3D Effects – Drop Shadow : 0 / 0 / 50 / 30 – Color : #000000
Image Add Borders 1 pixels background color : #1b1b1d
Write your signature.
Image – Resize – 950 pixels ( resize all layers checked )
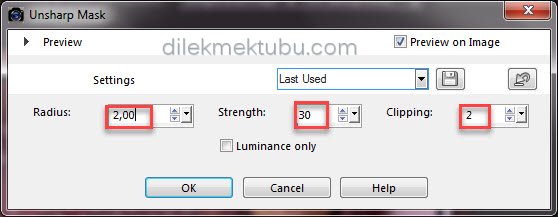
Adjust – Sharpness – Unsharp Mask
File Save as JPEG
I hope you enjoyed it.
Thank you so much.
For Example
Woman Tube – Lily (Thank you )

I would be very happy if you send your nice works to my e-mail address.
My Mail Adress
dilekmektubu@gmail.com


Yorum gönder
Yorum yapabilmek için oturum açmalısınız.