Psp Tutorial – Angela – English Translation

ANGELA
English Psp Tutorial – Translation
Thank you Jolcsi for your permission to translate your tutorials.
You can find the original lesson by clicking on the banner.

This tutorial is translated with Corel PSP X7.
Your Versions HERE
Plugins
You can find the original lesson by clicking on the banner.
This tutorial is translated with Corel PSP X7.
Your Versions HERE
Plugins
Mehdi-Wavy Lab 1.1
Filters Unlimited – Tramages – The Stump2
Filters Unlimited – Simple – 4 Way Average
Flaming Pear – Flood
Alien Skin/Eye Candy5 – Impact – Glass
Materials
Jolcsi148
Jolcsi623
Alpha Channel
Colors
 or
or 
or
Colors
1 – #a68c75
2 – #dacec0
3 – #ecc9aa
4 – #422f20
5 – #eee6db
6 – #ffffff
Preparations
Make the foreground color : #a68c75
Make the background color : #dacec0

You can adjust the Blend Mode / Opacity at your own discretion.
We start working
File – Open – Selections From Alpha Channel
Window – Duplicate or Shift+D
(Close the original and proceed on the Copy)
1.
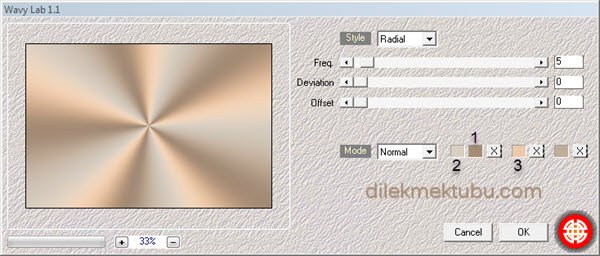
Effects – Plugins – Mehdi – Wayv Lab 1.1
Adjust – Blur – Gaussian Blur / Radius : 30
Layers – Duplicate
2.
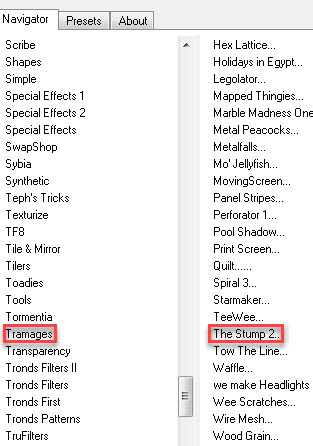
Effects – Plugins – I.C. NET Software – Filters Unlimited 2.0
Tramages – The Stump2

3.
Effects – Geometric Effects – Skew
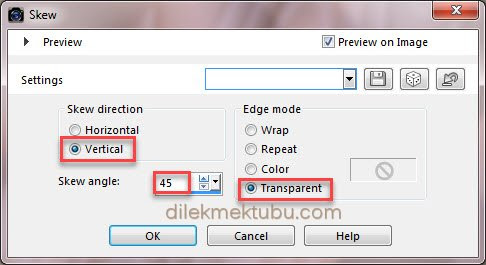
Effects -Image Effects – Seamless Tiling

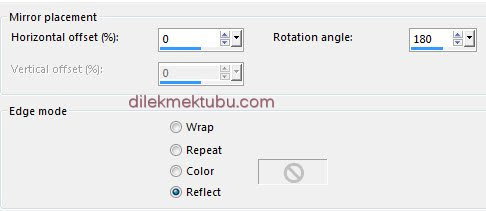
Effects – Reflection Effects – Rotating Mirror
4.
Effects – Plugins – I.C. NET Software – Filters Unlimited 2.0
Simple – 4 Way Average


5.
Selections – Load/Save – Load Selection From Alpha Channel : Selection #1

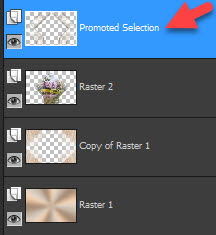
Selections – Promote Selection to Layer
Effects – 3D Effects – Drop Shadow : 0 / 0 / 53 / 20 – Color : #422f20 (4)
Effects – 3D Effects – Inner Bevel

Effects-Texture Effects – Blinds

Selections – Select None
6.
Effects – Reflection Effects – Rotating Mirror

Repeat Effects – Reflection Effects – Rotating Mirror
7.
Activate the Copy of Raster1 Layer.

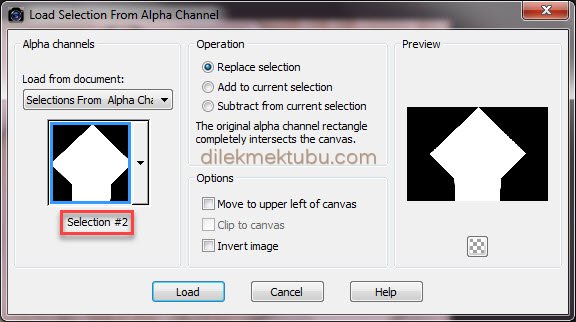
Selections – Load/Save – Load Selection From Alpha Channel : Selection #2
Edit – Cut
Layers – New Raster Layer
File – Open – Jolcsi148
Edit – Copy
Go back to your work.
Edit – Paste Into Selection.
Edit – Copy
Go back to your work.
Edit – Paste Into Selection.
Layers – Properties – Opacity : 78
Adjust – Sharpness – Sharpen
Select – Select None
8.
Effects – Plugins – Flaming Pear – Flood

Selections – Load/Save – Load Selection From Alpha Channel : Selection #3

Edit – Cut
Select – Select None
Activate the Promoted Selection Layer
9.
Layers – New Raster Layer
Selections – Load/Save – Load Selection From Alpha Channel : Selection #4

Fill with the foreground color – Color(1) : #a68c75
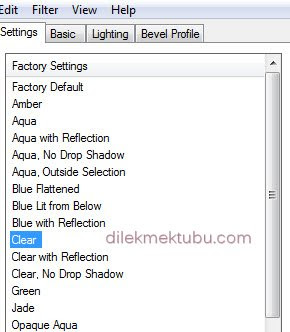
Effects – Plugins – Alien Skin Eye Candy 5:Impact / Glass : Clear
Select – Select None
Adjust – Sharpness – Sharpen
10.
Layers – New Raster Layer
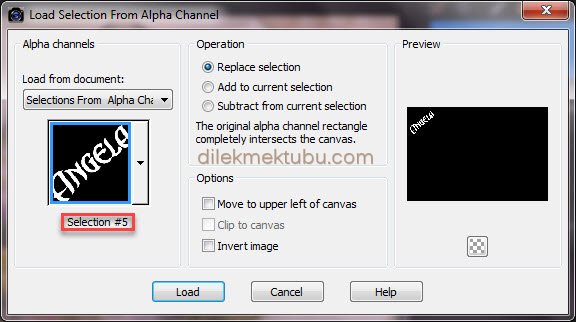
Selections – Load/Save – Load Selection From Alpha Channel : Selection #5
Fill with the foreground color – Color(1) : #a68c75
Select – Select None
Effects – 3D Effects – Drop Shadow : -7 / 0 / 100 / 0 – Color : #eee6db (5)
Repeat Effects – 3D Effects – Drop Shadow : 2 / 1 / 51 / 1 – Color : #000000
11.
Image Add Borders 2 pixels foreground color : #a68c75 (Color1)
Image Add Borders 2 pixels background color : #dacec0 (Color2)
Image Add Borders 2 pixels foreground color : #a68c75 (Color1)
Selections – Select All
Image Add Borders 45 pixels foreground color : #a68c75 (Color1)
Selections – Invert
Effects – Plugins – Mehdi – Wayv Lab 1.1 : Same Settings
Selections – Invert
Effects – 3D Effects – Drop Shadow : 0 / 0 / 44 / 36 – Color : #422f20 (4)
Selections – Select None
12.
Image Add Borders 1 pixels foreground color : #a68c75 (Color1)
Selections – Select All
Image Add Borders 45 pixels White color : #ffffff (Color6)
Selections – Invert
Effects – Texture Effects – Weave

Layers – New Raster Layer
Effects – 3D Effects – Cutout

Layers – Merge – Merge Down
Effects – Plugins – AAA Frames – Foto Frame

Selections – Select None
13.
File – Open – Jolcsi623
Edit – Copy
Go back to your work.
Edit – Paste As New Layer
Image – Resize : 80 Percent ( Resize all layers not checked )
Position as shown.
Make the shade as you want.
Make the shade as you want.
Write your signature.
Layers – Merge – Merge All (Flatten)
Image – Resize : 950 pixels ( Resize all layers checked )
File Save as JPEG.
Thank you so much.
For Example
Thank you so much.
For Example

Woman Tube : K@rine Dreams / Thank you
Landscape Tube : Guismo / Thank you

I would be very happy if you send your nice works to my e-mail address.
My Mail Adress
dilekmektubu@gmail.com


Yorum gönder
Yorum yapabilmek için oturum açmalısınız.