
You can find the original lesson by clicking on the banner.
Your Versions HERE
Plugins
Graphics Plus – Cross Shadow
FM Tile Tools – Blend Emboss
Filters Unlimited 2.0
Bkg Designer sf 10 I – Corner Right Wrap
Alien Skin Eye Candy 5:Impact – Glass
Mura’s Meister – Perspective Tiling
Tube – Jolcsi
Virág – Jolcsi
Dísz – Jolcsi
 OR
OR 

1 – #f8e85d
2 – #73904d
3 – #394724
4 – #000000
Preparations
Make the foreground color : #f8e85d
Make the background color : #73904d

Copy the Selections in the Selections Folder.
Copy the Texture in the Textures Folder.
We start working
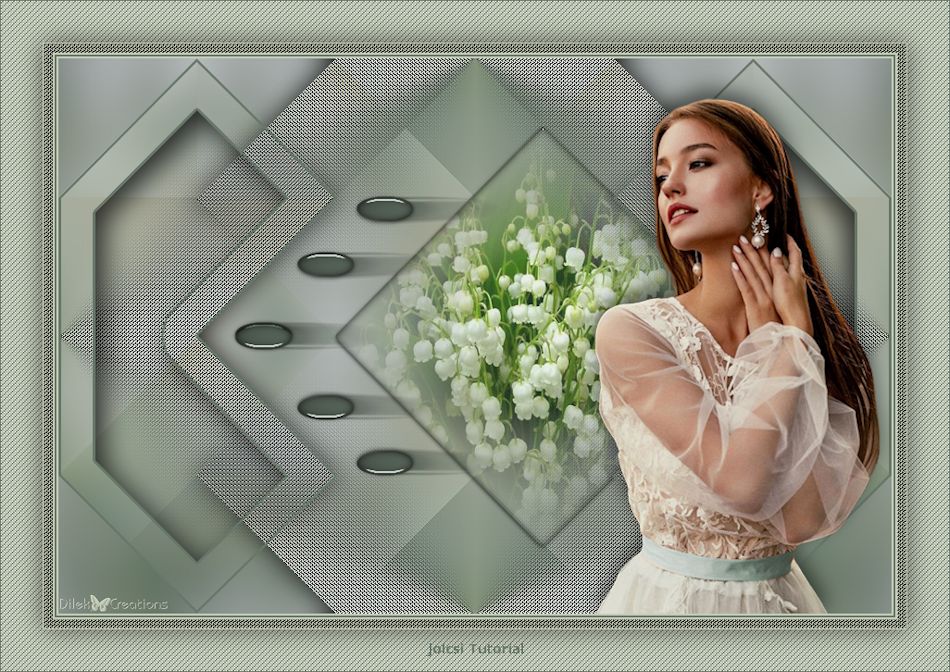
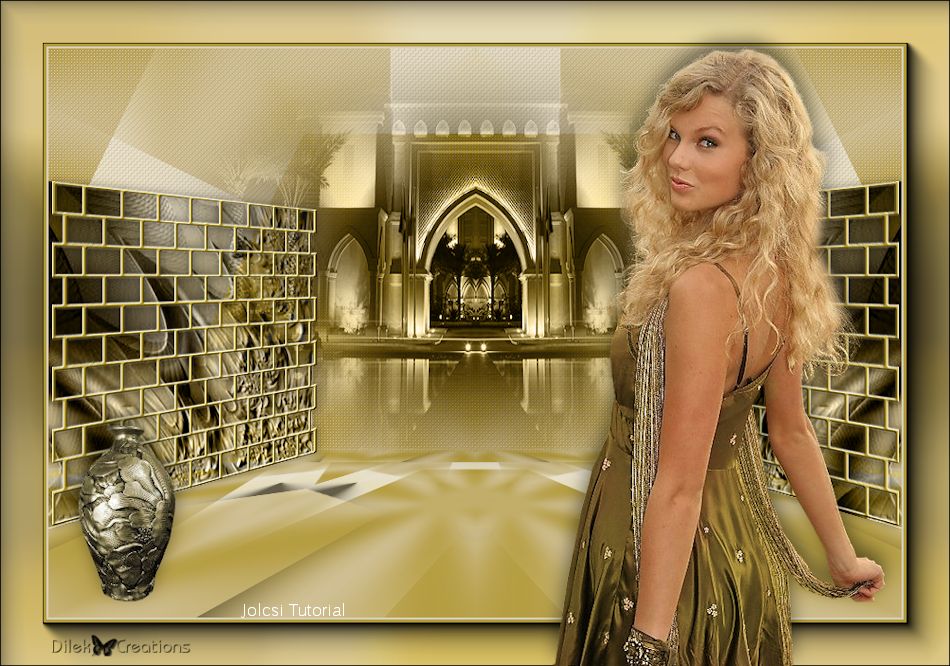
1.
Open the new transparent image of 800 x 650 pixels.

Fill with the gradient.
Effects – Plugins – Graphics Plus – Cross Shadow : Default
2.
Effects – Reflection effects – Feedback

Effects – Edge Effects – Enhance
Effect – Plugins – FM Tile Tools – Blend Emboss : Default
3.
Selections – Load/Save – Load Selection From Disk : 2256

Selections – Promote Selection to Layer
Selections – Select None
4.
Activate the Pick Tool(K) ![]()
Take the Select tool – Perspective(Ctrl) as below.

Grab the top right corner and twist it as shown.

Press M to close the Pick Tool.
Layers – Duplicate
Image – Mirror
Layers – Merge – Merge Down
Effects-3D effects – Drop Shadow : 0 / 0 / 60 / 32 – Color : #000000
Layers – Duplicate
5.
Effects – Plugins – I.C. NET Software – Filters Unlimited 2.0
Bkg Designer sf 10 I – Corner Right Wrap


Effects-3D effects – Drop Shadow : 0 / 0 / 60 / 32 – Color : #000000
Layers – Merge – Merge Down
Activate the Raster 1 Layer.
6.
File – Open – “napraforgó“
Edit – Copy
Go back to your work.
Edit – Paste As New Layer
Selections – Load/Save – Load Selection From Disk : 2256a

Adjust the floral image as you like in the frame!
Selections – Invert
Edit – Cut
Selections – Invert
7.
Effects – Plugins – Alien Skin Eye Candy 5:Impact / Glass

Selections – Select None
8.
Activate the Raster 1 Layer.
Effects – Plugins – MuRa’s Meister – Perspective Tiling

9.
Layers – New Raster Layer
Layers – Arrange – Send to Bottom
Fill with the gradient.
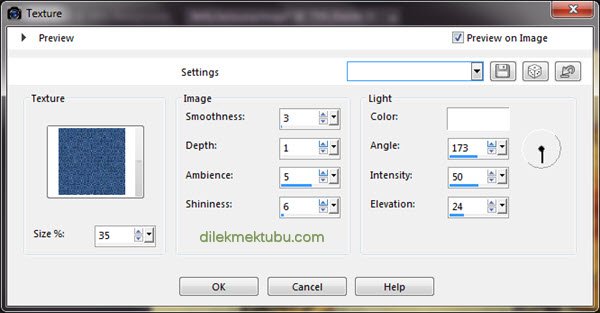
Effects – Texture Effects – Texture
10.
Activate the Top Layer

Layers – New Raster Layer
Selections – Load/Save – Load Selection From Disk : 2256b

Fill with the Color(3) : #394724
Selections – Select None
11.
File – Open – “Jolcsi244”
Edit – Copy
Go back to your work.
Edit – Paste As New Layer
Image – Resize : 60 percent
( Resize all layers not checked )
Place and shade as desired.
12.
File – Open – “Jolcsi112”
Edit – Copy
Go back to your work.
Edit – Paste As New Layer
No need move.
Layers – Properties – Blend Mode : Luminance (Legacy)
13.
Image Add Borders 2 pixels background color : #73904d (Color2)
Image Add Borders 3 pixels foreground color : #f8e85d (Color1)
Image Add Borders 1 pixels background color : #73904d (Color2)
Image Add Borders 1 pixels foreground color : #f8e85d (Color1)
Image Add Borders 1 pixels background color : #73904d (Color2)
Image Add Borders 1 pixels foreground color : #f8e85d (Color1)
Edit – Copy
14.
Selections – Select All
Image Add Borders 45 pixels : Color in memory.
Selections – Invert
Edit – Paste Into Selection
Adjust – Blur – Radial Blur

Efects – Edge Effects – Enhance
Selections – Invert
Effects-3D effects – Drop Shadow : 0 / 0 / 60 / 36 – Color : #000000
Selections – Select None
15.
File – Open – “Jolcsi113”
Edit – Copy
Go back to your work.
Edit – Paste As New Layer
No need move.
Layers – Properties – Blend Mode : Luminance (Legacy)
Write your signature.
Layers – Merge – Merge All (Flatten)
File Save as JPEG.
Thank you so much.
For Example

Women Tube : Angel Star ( Thank you )
Landscape Tube : Net ( Thank you )