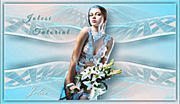
Psp Tutorial – English Translation – Beautiful Lady

Plugins
Mehdi – Wavy Lab 1.1
Mehdi – Sorting Tiles
Filters Unlimited 2.0 – Toadies – What are you?
MuRa’s Meister – Perspective Tiling
Filters Unlimited 2.0 – Bkg Designer sf10 III – Tremors
Alien Skin Eye Candy 5:Impact – Perspective Shadow
Materials
Colors
Psp Selection x 3
jol text
Jolcsi546
virág
jolcsi dekor
jolcsi dekor2
MASK-MD-041
 or
or 
Colors

1 – #b1aca9
2 – #fee6e7
3 – #ffffff
4 – #544c49
Preparations
We choose two colors.
Make the foreground color : #b1aca9
Make the background color : #fee6e7

Copy the Selection in the Selections Folder.
Open the mask in PSP and minimize it with the rest of the material.
We start working
1.
Open a new transparent image of 900 x 550 pixels.
Effects – Plugins – Mehdi Wayv Lab 1.1

Adjust – Blur – Gaussian Blur – Radius : 35
Effects – Image effects – Seamless Tiling

Effects – Plugins – Mehdi – Sorting Tiles

Effects – Edge Effects – Enhance
Effects – Image effects – Seamless Tiling

Adjust – Sharpness – Sharpen
2.
Selections – Load/Save Selection – Load Selection From Disk – Select : 2391

Selections – Promote Selection to Layer
Effects – Texture Effects – Weave

Adjust – Sharpness – Sharpen
Effects – 3D Effects – Drop Shadow

Selections – Modify – Select Selection Borders : 2 pixel

Fill with the background color : #fee6e7
Selections – Select None
Layers – Duplicate
Effects – Plugins – Filters Unlimited 2.0 – Toadies – What are you? : Default

Adjust – Sharpness – Sharpen
Layers – Arrange – Move Down
3.
Activate the Raster 1 Layer

Selections – Promote Selection to Layer
Selections – Select None
Effects – Reflection effects – Rotating Mirror – Rotation angle : 180 – Reflect checked

Effects- Plugins – MuRa’s Meister- Perspective Tiling

Activate the Magic Wand Tool ![]()
Select the transparent area.
Selections – Modify – Feahter ( Ctrl+H ) – Feather amount : 16
Press DELETE on the keyboard 3 times.
Selections – Select None
Layers – Arrange – Bring to Top
4.
Activate the Raster 1 Layer

Selections – Load/Save Selection – Load Selection From Disk – Select : 2391b

File – Open : Tube virág
Go back to your work.
Edit – Paste into Selection


Layers – New Raster Layer
Fill with the white color : #ffffff
Layers – New Mask Layer – From Image – MASK MD-041

Effects – Edge Effects – Enhance
Layers – Merge Group
File – Open – jolcsi dekor
Edit – Copy / Edit – Paste As New Layer
Position X : -1 – Position Y : 54
Layers – Properties – Blend Mode : Luminace Legacy
8.
Activate the Top Layer
File – Open – Jolcsi546
Edit – Copy
Go back to your work.
Edit – Paste As New Layer
Image – Resize : 90 percent ( resize all layers not checked )
Place it where you want and make a shadow.
File – Open – jol text.
Edit – Copy / Edit – Paste As New Layer
Activate the Pick Tool ( K )
Position X : 537 – Position Y : 395
Effects – Plugins – Alien Skin Eye Candy 5:Impact – Perspective Shadow

9.
Image – Add Borders – 2 pixels white color : #ffffff
Edit – Copy
Select – Select All
Image – Add Borders 10 pixels white color : #ffffff
Select – Invert
Edit – Paste into Selection
Effects – Texture Effects – Weave : Same Settings
Select-Invert
Effects – 3D Effects – Drop Shadow

Selections – Select None
Image – Add Borders – 1 pixels white color : #ffffff
Image – Add Borders – 2 pixels foreground color : #b1aca9
Image – Add Borders – 45 pixels white color : #ffffff
File – Open – jolcsi dekor2
Edit – Copy
Go back to your work.
Edit – Paste As New Layer
No need move.
Layers – Merge All (Flatten)
Write your signature.
Image – Resize 1000 pixels.
File Save as JPEG
Thank you so much.

Women Tube : Azalee


Yorum gönder
Yorum yapabilmek için oturum açmalısınız.