Psp Tutorial – English Translation – Julia
Julia
English Psp Tutorial – Translation
Thanks to Jolcsi for the invitation to translate your tutorials.
Thanks to Jolcsi for the invitation to translate your tutorials.
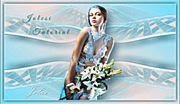
You can find the original lesson by clicking on the banner.
This tutorial is translated with Corel PSP X7.
Plugins
Mehdi – Grain Natural 2.0
Mehdi – Kaleidoscope 2.1
Mura’s Meister – Copies
Filters Unlimited – Tramages – Tow The Line
AP Lines – Lines SilverLining
Materials
2381.PspSelection
2381a.PspSelection
jocsi dekor2.png
jolcsi dekor.png
Jolcsi571.png
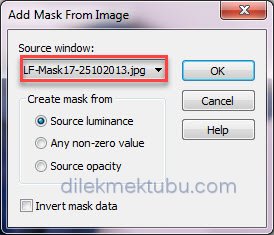
LF-Mask17-25102013.jpg
Colors
 or
or 
Colors

1 – #05286d
2 – #b4c5de
3 – #ffffff
4 – #000000
Preparations
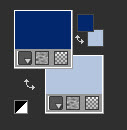
Make the foreground color : #05286d
Make the background color : #b4c5de
Copy the Selection in the Selections Folder.
Open the mask in PSP and minimize it with the rest of the material.
We start working
1.
Open a new transparent image of 900 x 550 pixels.
Prepare a gradient Radial as below.
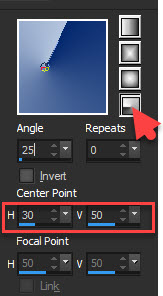
Fill with the gradient.
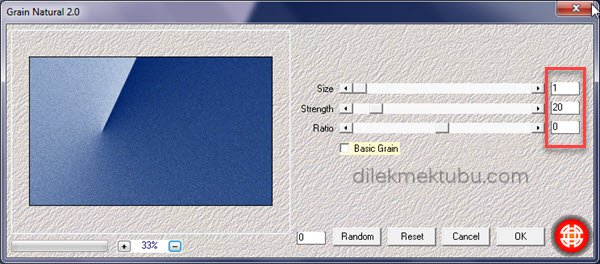
Effects – Plugins – Mehdi – Grain Natural 2.0
Effects – Edge Effects – Enhance More
2.
Effects- Plugins – Mehdi – Kaleidoscope 2.1

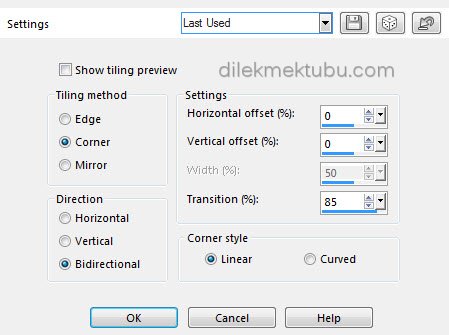
Effects -Image effects – Seamless Tiling
Selections – Load/Save Selection – Load Selection From Disk – Select : 2381

Selections – Promote Selection to Layer
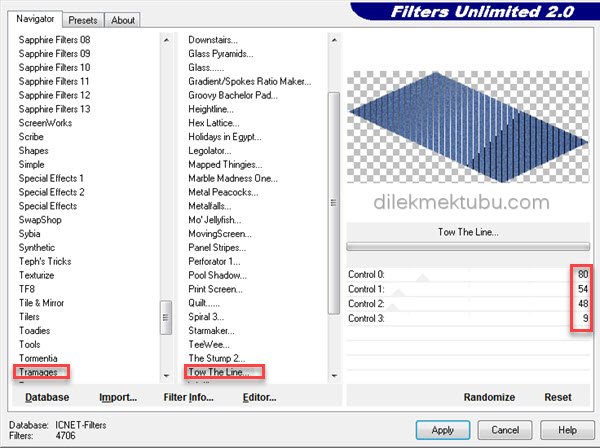
Effect – Plugins – I.C.NET Software – Filter Unlimited 2.0 – Tramages – Tow The Line
Effects – 3D Effects – Drop Shadow
Selections – Select None
3.
Layers – Duplicate
Image – Mirror Horizontal ( Mirror )
Image – Mirror Vertical ( Flip )
Layers – Merge – Merge Down
Activate the Raster 1 Layer
Selections – Load/Save Selection – Load Selection From Disk – Select : 2381a

Selections – Promote Selection to Layer
Selections – Modify – Contract : 30 Pixels
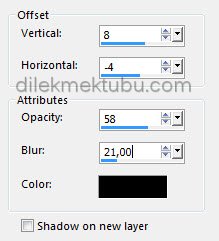
Effects – 3D Effects – Drop Shadow
Effects – 3D Effects – Drop Shadow
( Shadow on new layer checked )

Layers – Arrange – Move Up
Selections – Invert
Effects – Plugins – AP[Lines] – Lines SilverLining

Selections – Invert
Activate the Promote Selection 1 Layer
Selections – Promote Selection to Layer
Selections – Modify – Contract : 30 Pixels
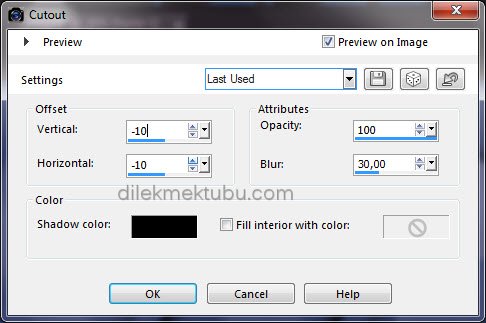
Effects – 3D Effects – Cutout

4.
Layers – New Raster Layer
Effects – 3D Effects – Cutout
Layers – Merge – Merge Down
Activate the Promote Selection 1 Layer
Selections – Modify – Contract : 30 Pixels
Selections – Promote Selection to Layer
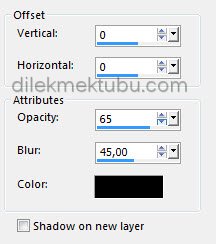
Effects – 3D Effects – Drop Shadow
Layers – Arrange – Move Up
Layers – Merge – Merge Down
Layers – New Raster Layer
File – Open – jolcsi dekor.png
Edit – Copy / Edit – Paste Into Selection
Colorize your colors.
Adjust – Sharpness – Sharpen
Layers – Merge – Merge Down
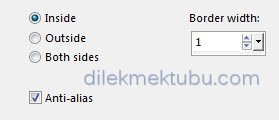
Selections – Modify – Select Selection Borders
Fill with the background color : #b4c5de
Selections – Select None
5.
Activate the Promote Selection 1 Layer
Selections – Load/Save Selection – Load Selection From Disk – Select : 2381a
Selections – Modify – Select Selection Borders : Same Settings
Fill with the background color : #b4c5de
Selections – Select None
Effects – 3D Effects – Drop Shadow : Same Settings
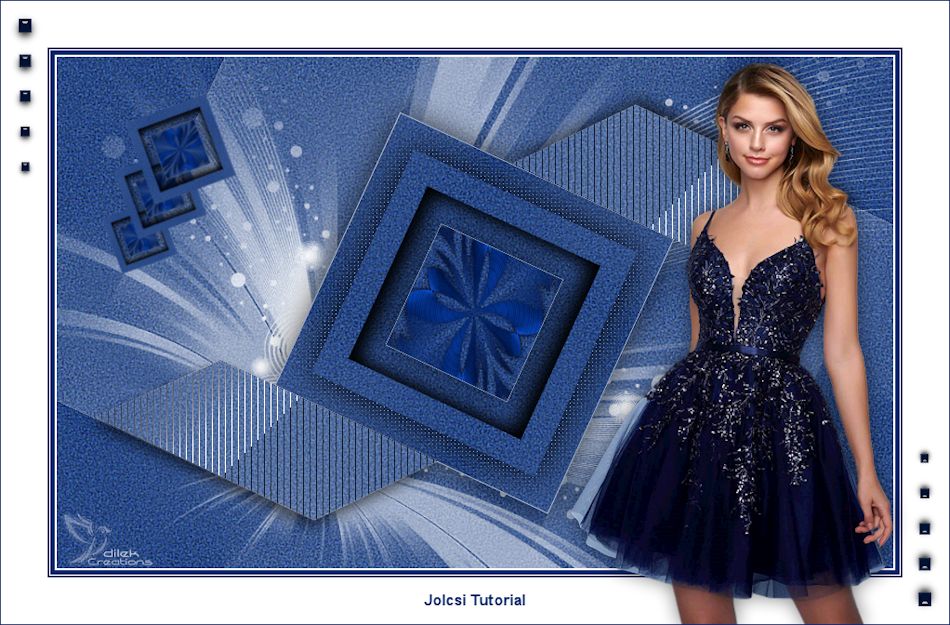
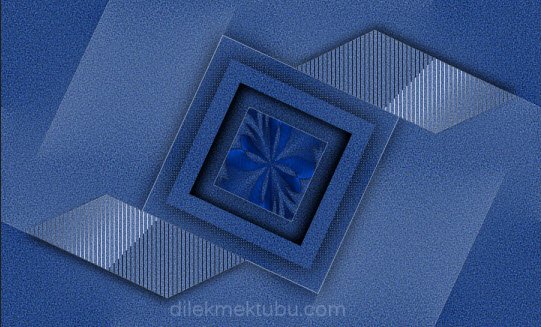
Result
6.
Activate the Promote Selection 2 Layer

Layers – Duplicate
Image – Resize : 35 Percent ( Resize all layers – not checked )
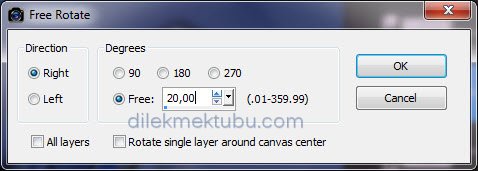
Image – Free Rotate
Effects – Plugins – Mura’s Meister – Copies
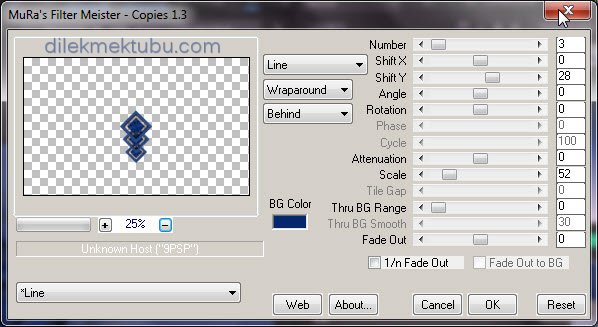
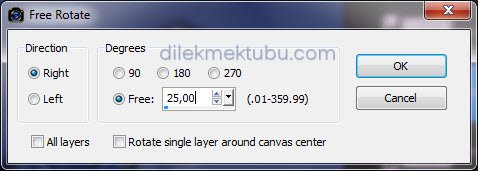
Image – Free Rotate
Activate the Pick Tool (K) 
Position X : 48
Position Y : 39
Effects – 3D Effects – Drop Shadow : Same Settings
7.
Activate the Raster1 Layer
Layers – New Raster Layer
Fill with the color : #ffffff
Layers – New Mask Layer – From Image
Layers – Duplicate
Layers – Merge – Merge Group
7.
Image – Add borders – 2 pixels : #ffffff
Image – Add borders – 5 pixels foreground color : #05286d
Image – Add borders – 1 pixels : #ffffff
Image – Add borders – 2 pixels foreground color : #05286d
Image – Add borders – 50 pixels : #ffffff
8.
File – Open : Tube “Jolcsi571”
Edit – Copy / Edit – Paste As New Layer
Image – Mirror Horizontal (Mirror )
Image – Resize : 110 percent ( Resize all layers – not checked )
Adjust – Sharpness – Sharpen
Place it as the model and shadow as you wish.
File – Open : Tube “jolcsi dekor2”
Edit – Copy / Edit – Paste As New Layer
No need move.
Image – Add borders – 1 pixels foreground color : #05286d
Write your signature
Image – Resize – 950 pixels ( Resize all layers – checked )
File save as Jpeg
Thank you so much.
For Example
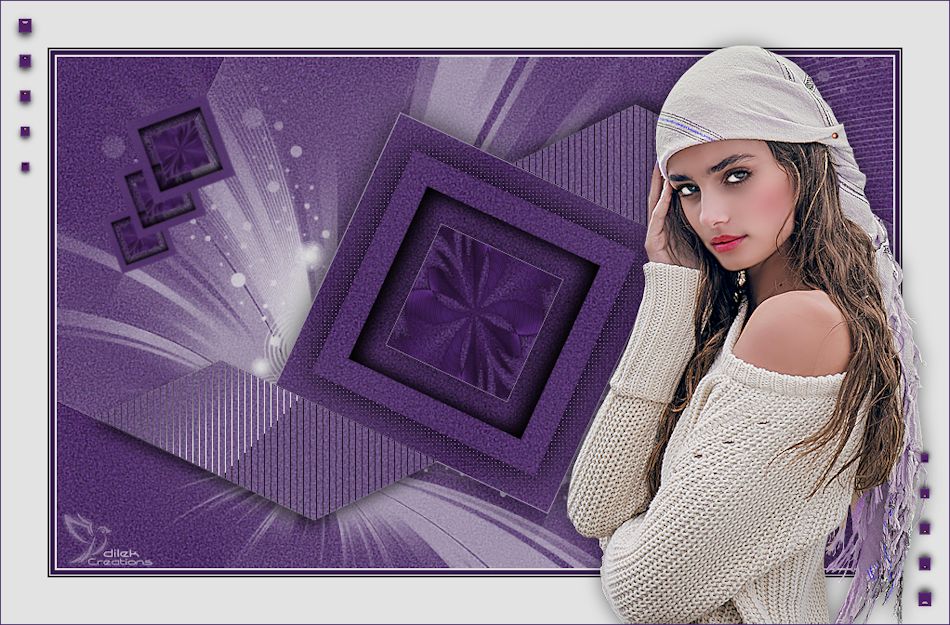
Women Tube : Mina

I would be very happy if you send your nice works to my e-mail address.
My Mail Adress
dilekmektubu@gmail.com


Yorum gönder
Yorum yapabilmek için oturum açmalısınız.