Psp Tutorial – English Translation – Dalma

DALMA
English Psp Tutorial Translation
Thanks to Jolcsi for the invitation to translate your tutorials.
You can find the original lesson by clicking on the banner.
Plugins
L en K’s – Palmyre
AP [Lines] – Lines SilverLining
Dsb Flux – Linear Transmission
Flaming Pear – Flexify2
Alien Skin Eye Candy 5:Impact – Glass
Materials
Psp Selection
Jolcsi556
Mask
Jolcsi dísz
dísz
Colors
 or
or 
Colors

1 – #226957
2 – #ffffff
3 – #000000
Preparations
Make the foreground color : #226957
Make the background color : #ffffff

Copy the Selection in the Selections Folder.
Open the mask in PSP and minimize it with the rest of the material.
We start working
1.
Open a new transparent image of 900 x 550 pixels.
Fill with the foreground color – #226957
Effects – Plugins – L en K’s – Palmyre

Effects – Edge Effects – Enhance
Layers – Duplicate
Activate the Raster 1 Layer
Adjust- Blur – Gaussian Blur – Radius : 20
Activate the Copy of Raster 1 Layer
Effects – Distortion Effects – Wave

2.
Effects – Geometric Effects – Perpective Horizontal – Distortion : 94

Image – Mirror ( Mirror Horizontal)
Repeat – Effects – Geometric Effects – Perpective Horizontal – Same Settings
Effects – Reflection Effects – Rotating Mirror

Effects – Plugins – Dsb Flux – Linear Transmission

Effects – Edge Effects – Enhance
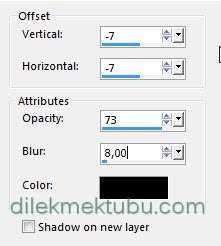
Effects – 3D Effects – Drop Shadow

Repeat – Effects – 3D Effects – Drop Shadow

Result

Effects – Pugins – AP [Lines]- Lines SilverLining

Effects – Edge Effects – Enhance
Layers – Duplicate
Layers – Merge – Merge Down
3.
Activate the Top Layer ( Copy of Raster 1 )
Effects – Plugings – Flaming Pear – Flexify 2


Effects – 3D Effects – Drop Shadow

Repeat – 3D Effects – Drop Shadow
Layers – Duplicate
Layers – Merge – Merge Down
Activate the Copy of Raster 1 Shadow Layer
Layers – New Raster Layer
Fill with the background color – #ffffff
Layers – New Mask Layer – From Image

Layers – Duplicate
Layers – Merge Group
Activate the – Eraser Tool 
The part below the flexify pattern will be deleted!
Result

4.
Activate the Raster 1 Layer

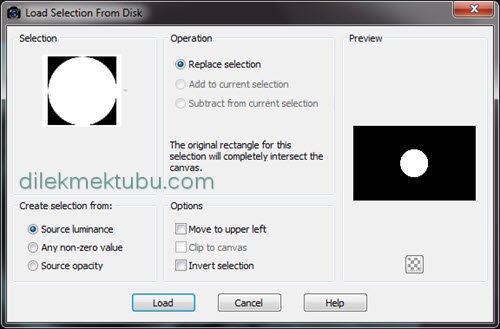
Selections – Load / Save Selection – Load Selection From Disk
Selections – Promote Selection to Layer
Layers – Arrange – Bring to Top
Layers – New Raster Layer
File Open “dísz” png
Edit – Copy / Edit – Paste into Selection
Adjust – Sharpness – Sharpen
Layers – Merge – Merge Down
Effects – Plugins – Alien Skin Eye Candy 5:Impact – Glass

Selections – Select None
Effects – 3D Effects – Drop Shadow

Center it!
5.
Image – Add borders – 2 pixels background color – #ffffff
Edit-Copy
Selections – Select All
Image / Add borders – 7 pixels foreground color – #226957
Selections – Invert
Effects – Pugins – AP [Lines] – Line SilverLining – Same Settings
Selections – Select None
Image – Add borders – 2 pixels background color – #ffffff
Selections – Select All
Image – Add borders – 50 pixels background color – #ffffff
Selections – Invert
Edit – Paste ınto Selection
Adjust – Blur – Gaussian Blur – Radius:25
Layers – New Raster Layer
Fill with the background color – #ffffff
Layers – New Mask Layer – From Image
Layers – Duplicate
Layers – Merge – Merge Group
Layers – New Raster Layer
Effects – 3D Effects – Cutout

Selections – Select None
6.
File – Open Tube “Jolcsi556”
Edit – Copy / Edit – Paste As New Layer
Image – Resize – 120 percent ( Resize all layers – not checked )
Place to the right and apply an offset shadow of your choice.
Fie Open – “Jolcsi dísz”
Edit – Copy / Edit – Paste As New Layer
Activate the Pick Tool (K) 
Position X:10 – Position Y:15
Image – Add borders – 1 pixels black color – #000000
Write your signature
Image / Resize – 950 pixels
File save as Jpeg
Thank you so much.
For Example

Women Tube – Gabry

I would be very happy if you send your nice works to my e-mail address.
My Mail Adress
dilekmektubu@gmail.com


Yorum gönder
Yorum yapabilmek için oturum açmalısınız.